0 - IntelliJ Setup
Here is my guide to setting up your first JavaFX group project in IntelliJ. Here we will try to avoid some known pitfalls when trying to get a project to work amongst team members with different equipment.
Pitfalls
Despite perhaps getting your previous hand-ins to work on your own computer, you may find it more difficult to get this to work across mulitple machines sharing a common repository.
In my first attempt at setting up the project, I used Java SE 17, JavaFX 17.0.6 and with Gradle 8.2 as the build tool. This was a solid setup, or so I thought.
The project failed to run on a newer MacBook laptop within our machine park. This computer used a different processor architecture and the native code backing JavaFX 17 just crashed after a 5 second timeout.
This turns out to be a known bug with JavaFX 17. The native code supporting this library may fail on some Mac systems. The solution is to upgrade the project to version 21 of Java and JavaFX, but this also requires an upgrade of the Gradle version used in your IntelliJ project.
It will be perfectly fine for you to code your project in Java 21. It is the latest LTS version of Java and supports the features of Java you’ve been working with so far.
Tutorial
- Avoiding frustrations when creating a new project for your map of Denmark.
- Setting up a JavaFX project in IntelliJ with Gradle as build tool.
- Upgrading the default project to use the following:
- Java SE 21
- JavaFX 21.0.2
- Gradle 8.6
1. Create a Default JavaFX Project
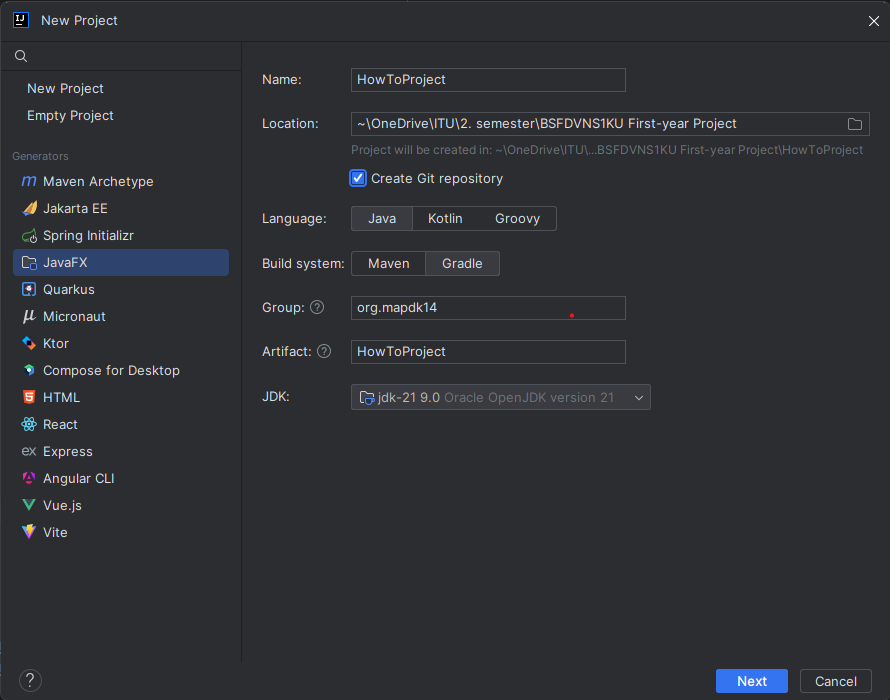
First you have to access the “New Project” dialogue. Files → New → Project...
- Select the JavaFX generator.
- Choose a name and a location for the project.
- Do create a Git repository at this time.
- Language should be
Javaand build systemGradle. - You may choose a different group name. This forms the root Java package name of your project. Avoid using terminal digits in the name or this will raise a warning.
- For your JDK, select any Java version 21 JDK. I use
Oracle OpenJDK 9.0here.
- On the next page you can choose additional libraries that IntelliJ provided for JavaFX. You don’t have to add any of these to start with.
2. Upgrade the Gradle Wrapper
Now you have a copy of the default “HelloApplication” to work on. A notice in the bottom right informs you that Gradle 8.2 is incompatible with Java 21. To take care of this you have to upgrade the project Gradle wrapper. This is easiest to do from terminal.
- Open a terminal set to your project folder. You can do this in IntelliJ from your left sidebar near the bottom.
- In Windows this opens a Windows PowerShell terminal. Use the command
.\gradlew wrapper --gradle-version 8.6to update the Gradle wrapper to version 8.6. This supports Java 21. - In OSX this opens a zsh terminal. The command is
./gradlew wrapper --gradle-version 8.6on this system. - The
.gradlefolder should now contain version 8.6 of Gradle.
Common issues with this include
- the terminal not being set to the correct folder or
gradlewnot having permission to execute.
You can use $ls -l to see the file permissions including permission to execute.
3. Change to JavaFX 21.0.2
Make sure to specify the latest version of JavaFX in your build.gradle file. Gradle acquires and manages the external libraries for your project.
javafx {
    version = '21.0.2'
    modules = ['javafx.controls', 'javafx.fxml']
}
4. Push and Enjoy!
You are now ready to work on your project. Push it to a repository of your choice and ask your group members to test basic Gradle tasks such as run, build, javadoc and test. These should work without any problems on all devices.